Quick tour - New
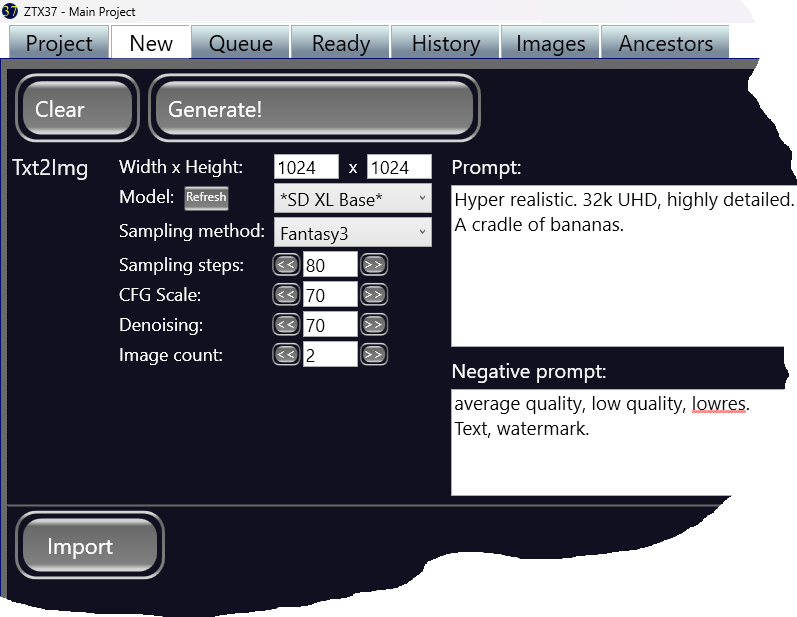
Here you define a new txt2img command and then hit the Generate! button to place it on the queue. From there it will be processed, in the background, and when the images are generated, you'll find them back at the ready page.
After you click Generate! , the command will be placed on queue, as it is. You can now edit the fields and the prompt to make another variation and also generate that. Or, when done, use the Clear button to fill this form with the project defaults.
Any time you think of a nice prompt, enter it here and hit that generate button.
Let's go through all values:
Width x Height : The dimensions of the image you want to generate. You can trade of resolution for speed and file size, choose dimensions that fit with the sort of image you generate. When testing things out, 512x512 might be a nice size, for more serious work: Stable diffusion XL is optimized for 1024x1024.
Larger size might be very demanding from your hardware or slow down to near zero speed.
Model: If you have downloaded multiple models, you can select here which model to use for this command. The model determines the creativity and specialisms. The model is the AI, the weights, the everything. (Just trying the same prompt with various models often is a good way to go. Models that seem useless with some prompts are spectacular with others)
Sampling method: Experiment with various sampling methods. It determines how the model is used.
Sampling steps: (range 1..150). The more steps the longer the generation takes but also the more time the AI had to work on it, thus the better the results. Although, overreach is also possible. Common good values range 20 to 70.
CFG Scale: (range 1..300). The CFG scale determines how strongly the images should confirm to the prompt. 70 is a good starting point. With rather high values the image tends to confirm very well to the prompt but quality goes down. At different models different CFG scales give the best results.
If you are familiar with Stable Diffusion tools:
If you multiply their CFG scales with 10, you get the scales ZTX37 uses.
Denoising: (range 0 to 1000) This is not used in a TXT2IMG but can already be set, the default denoising for when you later on start IMG2IMG commands based on the output of this command.
On a IMG2IMG command denoising determines how much to leave the original image in tact. At 0 you will get the same image you started with, at 1000 a completely unrelated image.
If you are familiar with Stable Diffusion tools:
If you multiply their denoising scales with 100, you get the scales ZTX37 uses. (The ZTX37 scales don't require a decimal point and for a common project all values are 2 digits. )
Image count: How many images you want to generate? I usually choose 4 as then the result still fits nicely on the screen without scrolling. Sometimes choosing a lot more and then pick the best ones is a great strategy. Or just one or two to first see what it comes up with, and finetune.
Or course: More images = longer wait.
Prompt: Your prompt. Here you tell what image you want. Good prompts generate awesome images, prompting is the essence of the craft of image generation.
Negative prompt: Things you don't want in your image. Often I read the advice to start with a very limited or even no negative prompt. I tend to put "Text, watermark" to somewhat avoid that silly texts.
Experiment with prompts and other parameters! That is a big part of the fun.
Above prompts you see this buttons:
You can select a piece of text and then use the (..) or [...] to put that text between brackets, either (emphasize) or [de-empasize) that part of the text. (((Or use multiple brackets to even stronger emphasize))) or [[[de-empasize]]].
Select a position in your text, and then hit the Segments button. This opens a dialog in which you can maintain a collection of segments, pieces of text you commonly use. Just pick one, and it will be inserted.
For the prompt and negative prompt there are 2 different segment lists.
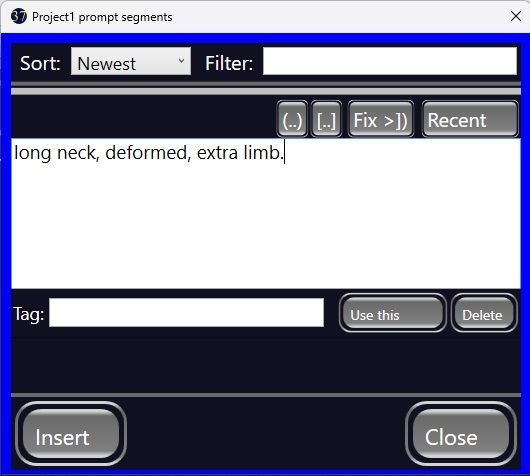
When you have a lot of segments, use the sort button and the filter to easily find them. Also tag segments, e.g. segments that describe hair but don't have the word hair in the text, could have the tag hair. When you specify a filter it is a filter over texts and tags. Thus a filter on "hair" gives all segments with the word hair in either the text or tag.
The button Recent gives a similar list of lines, but then all lines used recently. Thus when you add ta text to several prompts, typing it once will be enough.
Import
Besides a new TXT2IMG you could also start a new Import command. That is a simple import of images from your local disks into the ZTX37 database. You can drag images to the import and those will be imported.
After import one or more commands will appear in the ready tab. From there you can process the import as if it were images generated by Txt2Img.